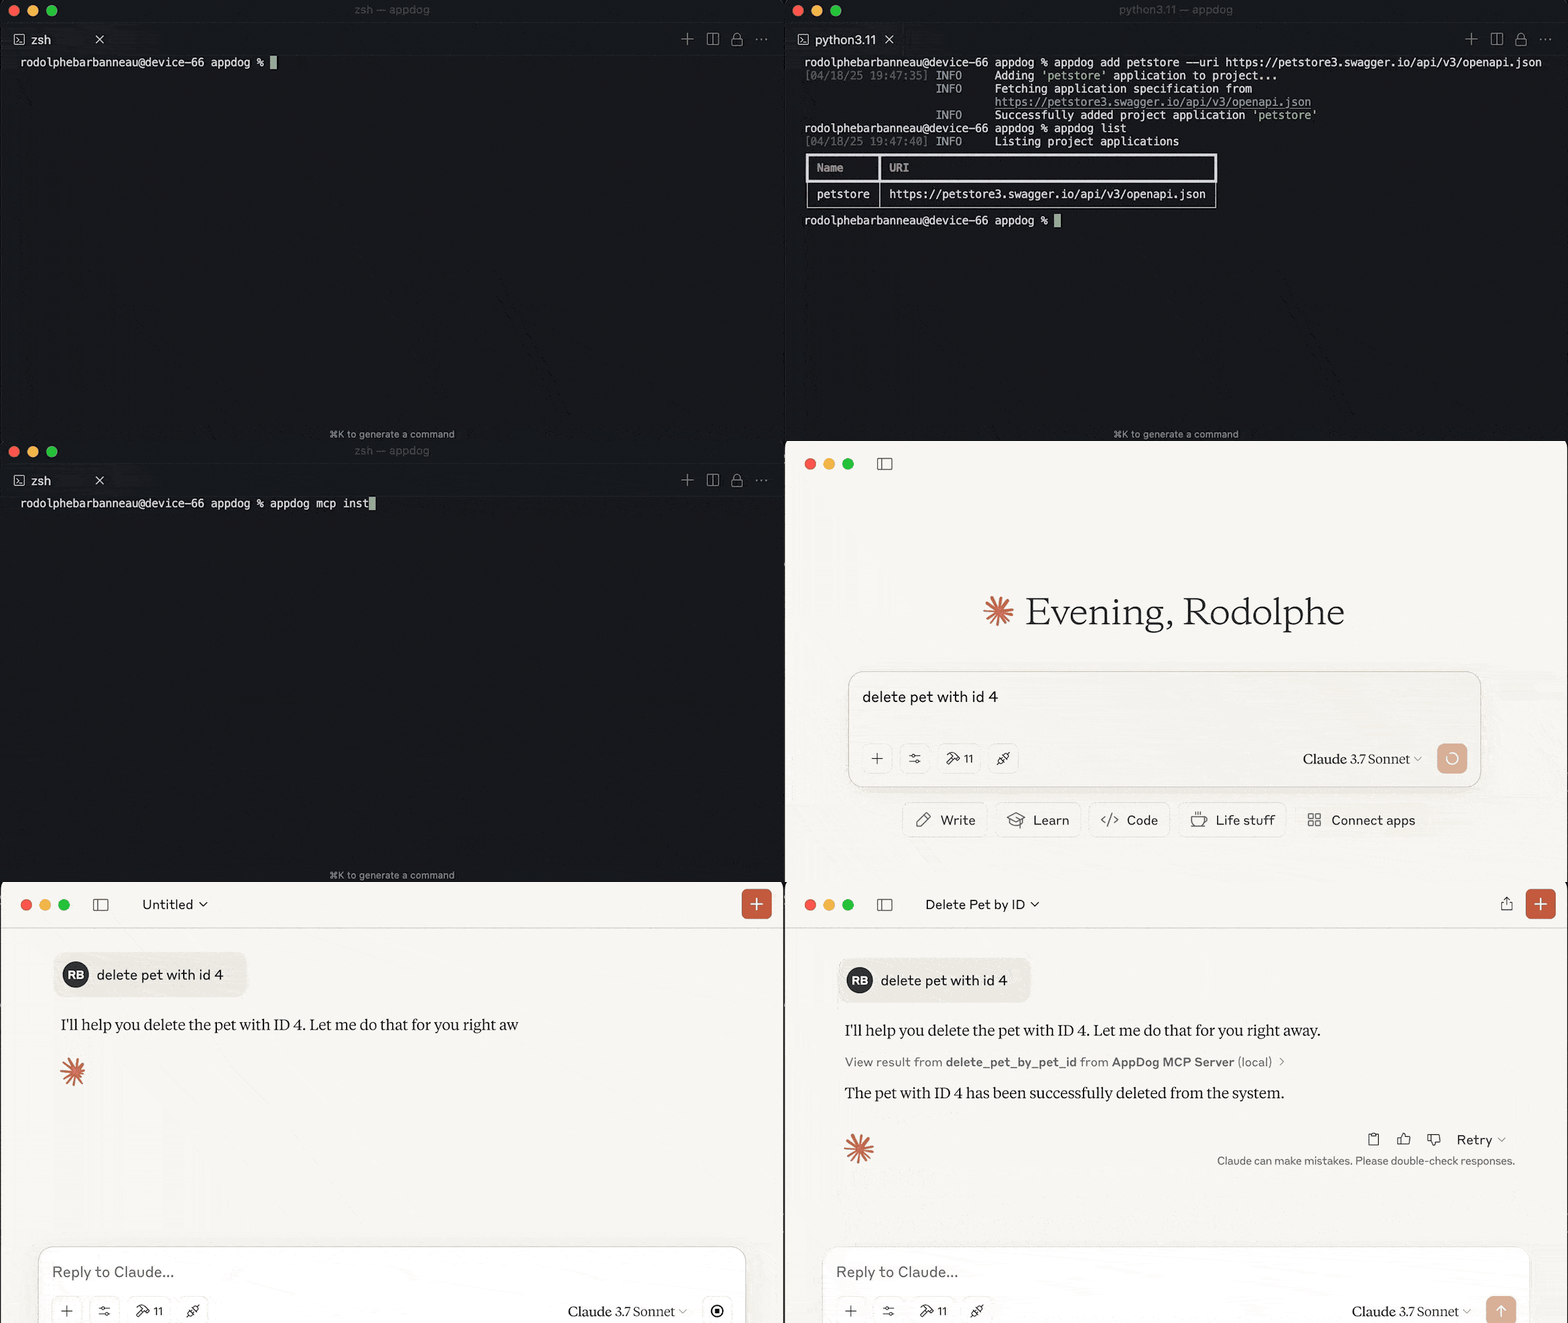
Compose and generate effortlessly async API clients and MCP servers from any OpenAPI specifications.
Claude Desktop doesn't handle yet resource templates (i.e. resource with parameters).
For Windows users, MCP Install command needs a manual edit of the generated Claude configuration. See this issue for more details.
AppDog is a Python package that simplifies working with OpenAPI-based APIs by:
- Automatically generating fully typed Python clients from OpenAPI specifications
- Creating ready-to-use MCP (Model Context Protocol) servers for API integrations
- Managing multiple API clients in a single project with version locking
- Providing a simple CLI for adding, removing, managing API clients, and installing MCP servers
uv add appdog# Create a new project in the current directory
appdog init
# Or specify a project directory
appdog init --project /path/to/project# Add a new API client from an OpenAPI spec URL or file
appdog add petstore --uri https://petstore3.swagger.io/api/v3/openapi.json# List all API clients in the project
appdog list
# Show details for a specific API client
appdog show petstore# Sync API clients with the project registry
appdog sync --upgrade
# Lock API clients
appdog lock --upgrade# Generate and install an MCP server with all registered APIs
appdog mcp install -n "My API Server"
# Or run the server directly
appdog mcp run -n "My API Server"
# Or run in development mode with inspector
appdog mcp dev -n "My API Server"After initializing a project and adding APIs, your project will have:
project/
├── apps.yaml     # Installed API appdog settings (auto-generated)
├── apps.lock     # Lock file with app specs and hashes (auto-generated)
└── ...           # Project files
After adding an API client, you can import and use it in your code:
# Import generated client
import appdog.petstore

# Use the client
async def main() -> None:
    async with appdog.petstore.client as client:
        pets = await client.get_pet_find_by_status(status='available')
        print(pets)
And compose your own MCP server:
import appdog.petstore
from mcp.server import FastMCP

mcp = FastMCP()

@mcp.tool()
async def hello_petstore() -> str:
    async with appdog.petstore.client as client:
        pets = await client.get_pet_find_by_status(status='available')
return petsAPI credentials can be configured using environment variables:
APPDOG_<CLIENT_NAME>_TOKEN=your_token
APPDOG_<CLIENT_NAME>_API_KEY=your_api_key
The package includes full support for MCP server generation:
-
Generate an MCP server file:
appdog mcp install -n "My API Server" -
Use with FastMCP or other MCP clients:
from appdog import Project
from mcp.server import FastMCP

mcp = FastMCP()

project = Project.load(project_dir=PROJECT_DIR)
project.mount(mcp)
--verbose,-v: Enable verbose output--debug,-d: Enable all debug logs, including dependencies--project,-p: Specify project directory (defaults to current directory)
appdog versionappdog init [--force] [--project PATH]--force: Force initialization even if config already exists
appdog add NAME --uri URI [--base-url URL] [OPTIONS]NAME: Application name--uri: OpenAPI specification URL or file path--base-url: Base URL for API calls--include-methods: Methods to include--exclude-methods: Methods to exclude--include-tags: Tags to include--exclude-tags: Tags to exclude--force: Overwrite application if it already exists with a different URI--frozen: Skip adding application specification in project lock file--upgrade: Force upgrading application specification--sync: Sync application specification with project registry
appdog remove NAME [OPTIONS]NAME: Application name--frozen: Skip removing application specification from project lock file--sync: Sync application removal with project registry
appdog list [--project PATH]appdog show NAME [--project PATH]NAME: Application name
appdog lock [OPTIONS]--force: Overwrite application if it exists with a different URI--upgrade: Overwrite application specification with a different URI
appdog sync [OPTIONS]--force: Overwrite application if it exists with a different URI--frozen: Skip updating application specification in project lock file--upgrade: Force upgrading application specification
appdog mcp [COMMAND] [OPTIONS]Commands:
install: Install applications in MCP clientrun: Run MCP applications in production modedev: Run MCP applications in development mode with inspector
Each command supports specific options:
--name,-n: Name of the MCP server (default: "AppDog MCP Server")--force: Overwrite server file if it exists--project,-p: Project directory (defaults to current)--output,-o: Output path for MCP server file
appdog mcp install [OPTIONS]--env-var,-v: Environment variables in KEY=VALUE format--env-file,-f: Environment file with KEY=VALUE pairs--with: Additional packages to install in dev mode--with-editable,-e: Local packages to install in editable mode
appdog mcp run [OPTIONS]--transport,-t: Transport to use for MCP run (stdio or sse)
appdog mcp dev [OPTIONS]--with: Additional packages to install in dev mode--with-editable,-e: Local packages to install in editable mode
Create a custom apps.yaml to configure your API clients:
petstore:
  uri: https://petstore3.swagger.io/api/v3/openapi.json
  base_url: https://petstore3.swagger.io/api/v3
  include_tags:
    - pet
- storeFor MCP usage, see environment variables section
Create a client with custom authentication:
from appdog.petstore import PetstoreClient

# Custom API key
client = PetstoreClient(api_key="YOUR_API_KEY")

# Custom headers
client = PetstoreClient(
    headers={"Authorization": "Bearer YOUR_TOKEN"}
)See CONTRIBUTING.md for information on contributing to the project.
This project is licensed under the MIT License - see the LICENSE file for details.


