- Introduction
- Cellpose Installation
- Allow Cellpose to Use GPU
- Cellpose GUI Exploration
- Cellpose 2 Training your own cellpose model
- Cellpose 3 Image Restoration
Cellpose is a versatile and powerful tool for cellular segmentation, designed to automatically detect and segment cells in microscopy images. It is a generalist algorithm for cell and nucleus segmentation (v1.0) that can be optimized for your own data (v2.0) and perform image restoration (v3.0).
if you want to learn more about Cellpose please read the published articles :
- Cellpose 1.0 paper : Stringer, C., Wang, T., Michaelos, M., & Pachitariu, M. (2021). Cellpose: a generalist algorithm for cellular segmentation. Nature methods, 18(1), 100-106.
- Cellpose 2.0 paper : Pachitariu, M. & Stringer, C. (2022). Cellpose 2.0: how to train your own model. Nature methods, 1-8.
- Cellpose 3.0 paper : Stringer, C. & Pachitariu, M. (2024). Cellpose3: one-click image restoration for improved segmentation. bioRxiv.
While there are several other segmentation algorithms available, Cellpose stands out due to its unique features and capabilities:
- Deep Learning-Based: Cellpose uses deep learning models, which can be trained on large datasets to improve accuracy over time.
- Versatility: It can handle a wide range of cell types and imaging conditions, making it a versatile tool for various biological applications.
- User-Friendly: Cellpose offers a graphical user interface (GUI) that makes it accessible to users with minimal programming experience.
- GPU Support: Cellpose can utilize GPU acceleration for faster processing, which is crucial for handling large datasets.
- Model Zoo: It provides a collection of pre-trained models (Model Zoo) that can be used out-of-the-box or fine-tuned for specific applications.
Tip
If you're new to using virtual environments, we recommend starting with our Setting Up a Python Development Environment tutorial before proceeding.
Linux, Windows and Mac OS are supported for running the code. For running the graphical interface you will need a Mac OS later than Yosemite. At least 8GB of RAM is required to run the software. 16GB-32GB may be required for larger images and 3D volumes. The software has been heavily tested on Windows 10 and Ubuntu 18.04 and less well-tested on Mac OS. Please open an issue if you have problems with installation.
- Install an [Anaconda distribution}(https://www.anaconda.com/download/success) of Python. Note you might need to use an anaconda prompt if you did not add anaconda to the path.
- Open an anaconda prompt / command prompt which has conda for python 3 in the path
- Create a new environment with
conda create --name cellpose python=3.8. We recommend python 3.8, but python 3.9 and 3.10 will likely work as well. - To activate this new environment, run
conda activate cellpose - To install cellpose with the GUI, run
python -m pip install cellpose[gui]. If you're on a zsh server, you may need to use ' ':python -m pip install 'cellpose[gui]'.
Note
Note you will always have to run conda activate cellpose before you run cellpose.
I provide a simple script in my Automate Cellpose GUI Opening to save you from repeating this tedious task.
If you have issues with installation, see the docs for more details.
It is a good alternative if you don't want to install conda and already have python3 on your machine. The main difference is that you will need to choose where to install the environment and the packages. Cellpose will then live in this environment and not be accessible from other environments.
- Install python3.8 or later from python.org. This will be the version of python that will be used in the environment. You can check your python version with
python --version. - Navigate to the directory where you want to create the environment and run
python3 -m venv cellposeto create a new environment called cellpose. - Activate the environment with source
cellpose/bin/activateon Mac/Linux orcellpose\Scripts\activateon Windows. A prefix (cellpose) should appear in the terminal. - Install cellpose into the cellpose venv using pip with
python -m pip install cellpose. - Install the cellpose GUI, with
python -m pip install cellpose[gui]. Depending on your terminal software, you may need to use quotes like this:python -m pip install 'cellpose[gui]'. - You can now run cellpose from this environment with
python -m cellposeorcellposeif you are in the cellpose directory. - To deactivate the environment, run
deactivate.
If you plan to process a large number of images, consider installing the GPU-accelerated version of PyTorch (if it's not already installed). To utilize your NVIDIA GPU with Python, follow these steps:
First Install the NVIDIA driver: Visit this website to download and install the latest driver for your GPU.
Next we need to remove the CPU version of torch:
pip uninstall torch
To install the GPU version of torch, follow the instructions here. The conda install is strongly recommended, and then choose the CUDA version that is supported by your GPU (newer GPUs may need newer CUDA versions > 10.2).
For instance this command will install the 11.6 version on Linux and Windows :
conda install pytorch pytorch-cuda=11.6 -c pytorch -c nvidia
If the latest CUDA versions don't work, try an older version like cuda 11.3:
conda install pytorch==1.12.0 cudatoolkit=11.3 -c pytorch
After install you can check conda list for pytorch, and its version info should have cuXX.X, not cpu.
You can drag and drop image files (.tif, .png, .jpg, or .gif) into the GUI to run Cellpose or manually segment them. During processing, a progress bar will appear and you will be unable to interact with the GUI until it has finished running. For more information about what's happening behind the scenes, refer to the terminal or command prompt where the GUI was launched from.
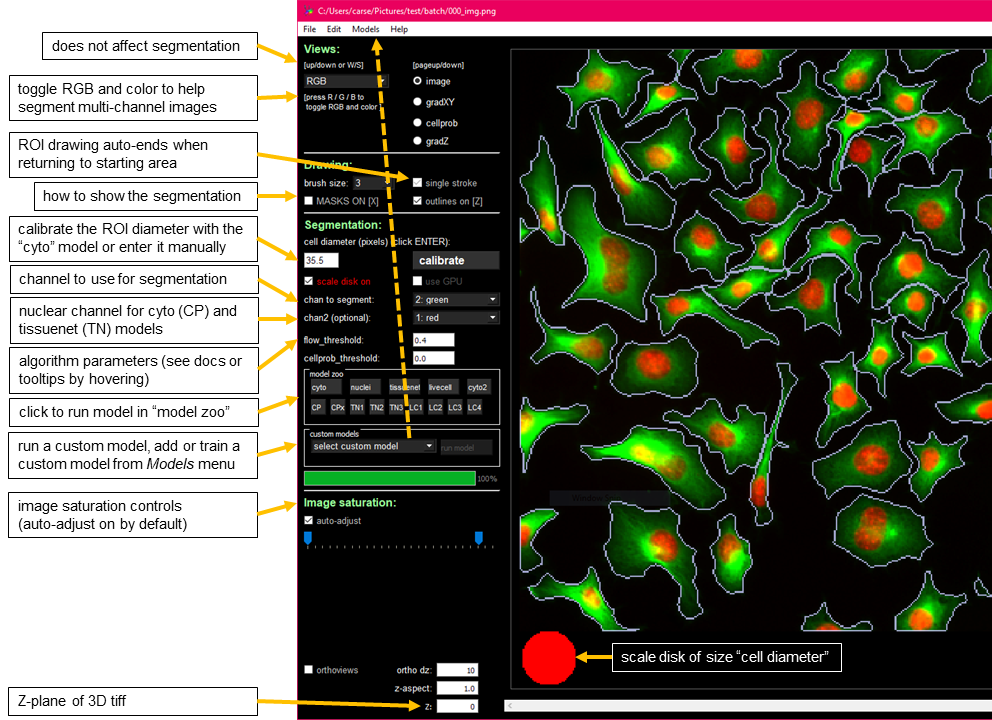
allows you to toggle between channels/colors, which can be helpful when segmenting multi-channel images. After segmentation, you can also switch between different views to gain a deeper understanding of how the algorithm interprets your images.
To create a mask, right-click and hover your mouse over the red circle without holding it down. The mask will be complete once you return your mouse to the circle. Masks are automatically saved to _seg.npy after each addition in 2D mode. This feature can be disabled in the "File" menu if autosaving is slow due to large images.
Overlapping masks are not allowed. If you draw a new mask on top of an existing one, it will be cropped to prevent overlap.
In 2D mode, use single strokes when drawing masks (if single_stroke is enabled).
In 3D mode, disable single_stroke and draw separate strokes for each plane. Note that complex cell shapes can be achieved by drawing multiple strokes on the same plane in 3D. Auto-Save and Mask Deletion. In 3D mode, masks are not auto-saved. To save a mask, click CTRL+S or select "Save" from the "File" menu.
Bulk Mask Deletion
Use the 'delete multiple' button to select and delete multiple masks at once. Masks can be deselected by clicking on them again. Alternatively, create a rectangular region to delete a group of masks by clicking the 'delete multiple' button and then moving and/or resizing the region.
Enable GPU: If you have installed the CUDA version of MXNet, activate it for potential speedups when running images in the GUI.
Enter the approximate diameter of your cells manually or press "Calibrate" to let the model estimate it (estimated size represented by a disk at the bottom of the view window, which can be disabled by unchecking "Scale Disk On").
Caution
Changing the diameter will change the results that the algorithm outputs. When the diameter is set smaller than the true size then cellpose may over-split cells. Similarly, if the diameter is set too big then cellpose may over-merge cells.
Channel to Segment: Specify the channel containing the cytoplasm or nuclei. Optional Channel (Chan2): If using the Cytoplasm Model, select the nuclear channel for this option.
Flow Threshold
To prevent the network from predicting arbitrary flows, a flow threshold parameter is used to filter out inconsistent predictions. This value determines the maximum allowed error between the predicted flows and the actual flows in the image. If cellpose is not returning as many ROIs as expected, you can increase this threshold to allow more flexible predictions. Conversely, if it's returning too many ill-shaped ROIs, decrease the threshold.
Cellprob Threshold
The network predicts three outputs: X flows, Y flows, and a "cell probability" value. The cell probability output is sigmoid-transformed, ranging from around -6 to +6. To determine ROIs, only pixels above the cellprob threshold are considered. If cellpose is not returning as many ROIs as expected, decrease this threshold to allow more pixels to be included. Conversely, if it's returning too many ROIs from dim areas, increase the threshold.
Each model will be downloaded automatically to your models.MODELS_DIR (see Installation instructions for more details on MODELS_DIR).
Important
All built-in models were trained with the ROIs resized to a diameter of 30.0 (diam_mean = 30), except the ‘nuclei’ model which was trained with a diameter of 17.0 (diam_mean = 17).
Cytoplasm model ('cyto3', 'cyto2', 'cyto')
The cytoplasm models in cellpose are trained on two-channel images, where the first channel is the channel to segment, and the second channel is an optional nuclear channel.
Set channels to a list with each of these elements, e.g. channels = [0,0] if you want to segment cells in grayscale or for single channel images, or channels = [2,3] if you green cells with blue nuclei.
Nucleus model (‘nuclei’)
The nuclear model in cellpose is trained on two-channel images, where the first channel is the channel to segment, and the second channel is always set to an array of zeros.
Therefore set the first channel as 0=grayscale, 1=red, 2=green, 3=blue; and set the second channel to zero, e.g. channels = [0,0] if you want to segment nuclei in grayscale or for single channel images, or channels = [3,0] if you want to segment blue nuclei.
Dataset-specific Models
The main built-in models are dataset-specific models trained on one of the 9 datasets in the Cellpose3 paper. These models do not have a size model. If the diameter is set to 0.0, then the model uses the default diam_mean for the diameter (30.0).
Cell images
- tissuenet_cp3 (A large-scale dataset for training segmentation models, containing over 1 million manually labeled cells in tissue images)
- livecell_cp3 (A large-scale dataset for label-free live cell segmentation)
- cyto2_cp3 (A large-scale dataset for label-free live cell segmentation by Mouseland)
yeast cell images
- yeast_PhC_cp3 (Yeast segmented phase contrast images (10422 cells))
- yeast_BF_cp3 (Yeast segmented Bright-field images (23046 cells))
Bacterial cell images
- bact_phase_cp3 (Bacterial segmented phase contrast images)
- bact_fluor_cp3 (Bacterial segmented Fluorescence images)
- deepbacs_cp3 (Bacterial segmented Bright-field + Fluorescence images)
- Pan = left-click + drag
- Zoom = scroll wheel (or +/= and - buttons)
- Full view = double left-click
- Select mask = left-click on mask
- Delete mask = Ctrl (or Command on Mac) + left-click
- Merge masks = Alt + left-click (will merge last two)
- Start draw mask = right-click
- End draw mask = right-click, or return to circle at beginning
Caution
Training can be initiated with one of the pre-trained Cellpose models or from scratch. Each time you start training, whether using a built-in model or beginning anew, the network will re-train on all previously labelled images in the folder, treating them equally and without weighting.
If you restart a previously retrained network, it will be biased towards the earlier images it has already been trained on. Conversely, if you create a custom model with different images and retrain it, the network will downweight the original images in favor of the new ones not included in the updated training set. To avoid these imbalances, we recommend keeping all images that should be trained together for the same model in the same folder.
Learn the process with the video tutorial.
-
Drag and drop an image from a folder of images with a similar style (like similar cell types).
-
Run the built-in models on one of the images using the “model zoo” and find the one that works best for your data. Make sure that if you have a nuclear channel you have selected it for CHAN2.
-
Fix the labelling by drawing new ROIs (right-click) and deleting incorrect ones (CTRL+click). The GUI autosaves any manual changes (but does not autosave after running the model, for that click CTRL+S). The segmentation is saved in a _seg.npy file.
-
Go to the “Models” menu in the File bar at the top and click “Train new model…” or use shortcut CTRL+T.
-
Choose the pretrained model to start the training from (the model you used in #2), and type in the model name that you want to use. The other parameters should work well in general for most data types. Then click OK.
-
The model will train (much faster if you have a GPU) and then auto-run on the next image in the folder. Next you can repeat #3-#5 as many times as is necessary.
-
The trained model is available to use in the future in the GUI in the “custom model” section and is saved in your image folder.
-
If you have 3D data, please save random XY, YZ and XZ slices through your 3D data, ideally sufficiently spaced from each other so the information each slice has is distinct. Then put these slices into a folder and start the human-in-the-loop training. You can then use the new custom model on new 3D data.
Learn more about this in the Cellpose 3.0 article.
The image restoration module denoise provides functions for restoring degraded images. There are two main classes, DenoiseModel for image restoration only, and CellposeDenoiseModel for image restoration and then segmentation.
There are three types of image restoration provided, denoising, deblurring, and upsampling, and for each of these there are two models, one trained on the full cyto3 training set and one trained on the nuclei training set.